
This Ganesh Utsav, try something different! Make your very own Ganesh idol at home. Making your own clay Ganesha is a fantastic, eco-friendly alternative to purchasing Ganesha murtis made from materials that may cause water pollution during Visarjan.
If you are worried about how to accomplish this task, don’t stress. We have everything you need to get started right here! We know that learning something new takes practice and patience. So, we put together a blog that will help you learn how to make Ganesha idols with clay easily. The following pointers will teach you how to make Ganesha with clay, step by step.
What you will need:
- Camlin Modelling Clay
- Camel Artist Acrylic Colours, Assorted pack of 12 shades
- Toothpick
Step 1: Dividing the clay
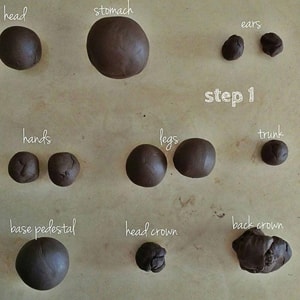
Take the modelling clay in your hand and divide it into proportions for different body parts of Ganesha.
Step 2: Make the stomach and the base
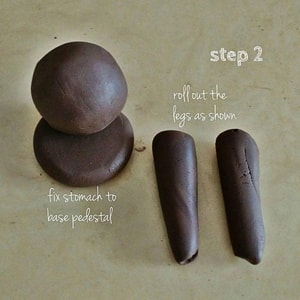
Flatten the modelling clay you set aside for the base like you would roll out a roti. Flatten the clay in such a way that it can hold the rest of the idol in place. Insert a toothpick in the middle of this modelling clay base, to hold the stomach in place. This will ensure that the structure stays in place even after drying. Use water to add a little moisture wherever necessary, while shaping your clay.
Step 3: Make the legs
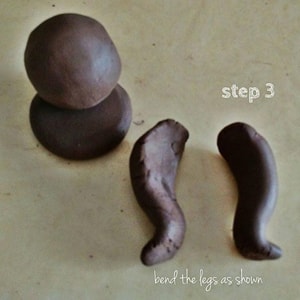
Roll two pieces of modelling clay to make legs. Lightly press at the bottom of the legs to make the shape of feet.
Step 4: Make the hands
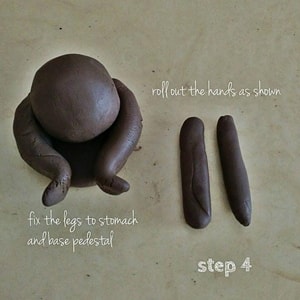
Connect the legs to the stomach and the pedestal using toothpicks. Press these into place well enough so that the joints are not visible. Once you are satisfied with the way these parts are securely connected together, roll out the shapes of arms out of the modelling clay and set them aside.
Step 5: Connect the hands to the body
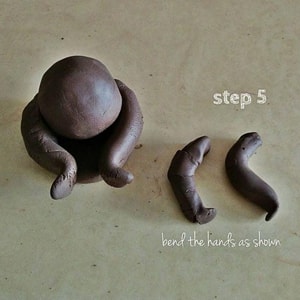
Bend the pieces at the end slightly to give the shape of hands, as shown in the images.
Step 6: The arms
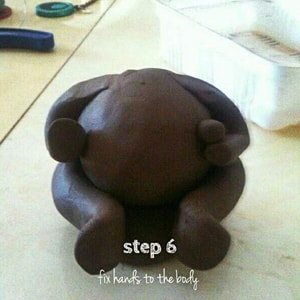
Attach the arms to the body as shown in the image.
Step 7: The head of Ganesha
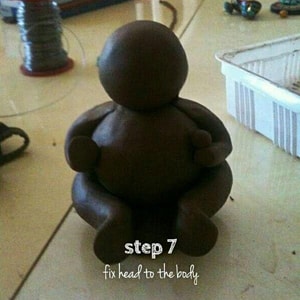
Roll the modelling clay into a round shape for the head. Place the head on the body.
Step 8: The ears and trunk of Ganesha
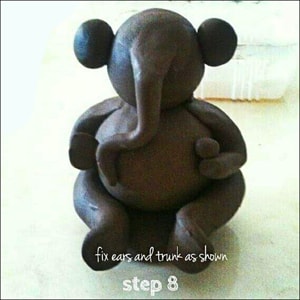
Shape two pieces of modelling clay to make the ears. You can use the image as a reference. Similarly, take the clay and shape it into a trunk.
Step 9: Designing Ganesha’s features
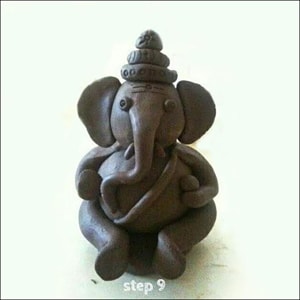
Using a toothpick, draw the features on the Ganesh idol. Gently flatten the ears.
Step 10: Decorating the Ganesh idol
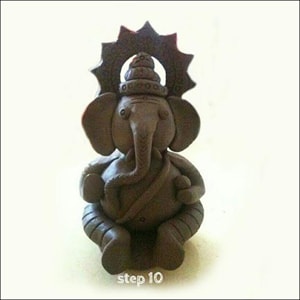
To make the crown, first roll out the modelling clay like a roti, about 6 cm in diameter. Once you are done rolling it out, use tools like a pen cap and a toothpick to make patterns on the crown. Allow this to dry. Place it on the Ganesh idol with some wet clay. Set the idol aside to dry off.
The making of Lord Ganesha at home is not difficult at all. To become a pro at it, start small and then try a bigger size. You can even use Camel Artist Acrylic Colours to paint your finished idol. All the best!


Did this article help you make your eco-friendly Ganesha?
Share your experience with us in the comments below.
Leave a comment
Comment added
Comment updated
Comment deleted
More inspiration

“
“Every colour has a purpose. An artist must keep this purpose in mind while handling it to get the most of it.”